
They say a way to a man's heart is through his stomach. The same maybe true for us girls too.
We gals like to eat. We love tasty food. And we love a man who knows his way around the kitchen.
One of the most wonderful things my man brought to our relationship...Chilaquiles (pronunciation: chill-a-keel-es). As I am thinking back, I will tell you all the day after we brought the Short Chic home from the hospital my husband made this for me for breakfast.


 Step 2: Chop Onions.
I love onions. My husband does not. So we usually half it. I use half the onions a recipe calls for to make him happy. I used about 1/2 of a medium sized onion.
 Step 3: Heat Oil and Saute Onions
Heat up that oil and saute the onions. In this photo, maybe the husband got the onions a bit too brown (but he knows I like that so I will forgive him!)
 Step 4: Add chips
After the onions are starting to brown, add the chips. It might be best to add a little at a time. Breaking them up as you go. You want to mix the chips into the oil and brown the chips. We used approximately an 8 ounce bag of chips.
 Step 5: Add Salsa
The next step is to add the salsa and cook it into the chips. This step will go quickly. When I was younger I would get annoyed with my mom because I would ask her how to make something and she would just say, add some of this, and some of that. She could never tell me HOW MUCH! But, I have turned into her. I do not know how much salsa you should add. Add enough to cover all the chips. But not so much that it is swimming in salsa.
Of course this is also an important step because this will determine how spicy your overall dish is. The hotter the salsa the spicier the Chilaquiles will be.
 Step 6: Add cheese.
Again, I guesstimate here. Do you love cheese, load it up. I am going to guess we used about a cup of cheese.
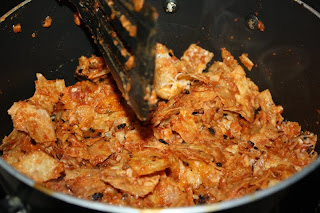 FINAL PRODUCT
When the dish is all mixed together and the chips have cooked down. It is done.
Eating Chilaquiles: I prefer to eat this dish for breakfast with eggs. I do believe you could easily add shredded chicken or pork and some black olives and have a great supper.
Happy Eating!
I have linked up!

We gals like to eat. We love tasty food. And we love a man who knows his way around the kitchen.
One of the most wonderful things my man brought to our relationship...Chilaquiles (pronunciation: chill-a-keel-es). As I am thinking back, I will tell you all the day after we brought the Short Chic home from the hospital my husband made this for me for breakfast.

There maybe many other "fancy" ways to make chilaquiles. But our way is simple and easy. And oh so yummy!
For us, making this dish always starts with leftover chips and salsa from a Mexican restaurant. Why, because we think they have the best tortilla chips! They just work better for this dish than store purchased chips.

Step 1: Gather your supplies
You will need tortilla chips (again, I recommend restaurant chips), salsa, oil, onion, and cheese.

I love onions. My husband does not. So we usually half it. I use half the onions a recipe calls for to make him happy. I used about 1/2 of a medium sized onion.

Heat up that oil and saute the onions. In this photo, maybe the husband got the onions a bit too brown (but he knows I like that so I will forgive him!)

After the onions are starting to brown, add the chips. It might be best to add a little at a time. Breaking them up as you go. You want to mix the chips into the oil and brown the chips. We used approximately an 8 ounce bag of chips.

The next step is to add the salsa and cook it into the chips. This step will go quickly. When I was younger I would get annoyed with my mom because I would ask her how to make something and she would just say, add some of this, and some of that. She could never tell me HOW MUCH! But, I have turned into her. I do not know how much salsa you should add. Add enough to cover all the chips. But not so much that it is swimming in salsa.
Of course this is also an important step because this will determine how spicy your overall dish is. The hotter the salsa the spicier the Chilaquiles will be.

Again, I guesstimate here. Do you love cheese, load it up. I am going to guess we used about a cup of cheese.

When the dish is all mixed together and the chips have cooked down. It is done.
Eating Chilaquiles: I prefer to eat this dish for breakfast with eggs. I do believe you could easily add shredded chicken or pork and some black olives and have a great supper.
Happy Eating!
I have linked up!
Sounds delish. Love reading Ur blogs, Missy! They are so well written and fun to read:-)
ReplyDelete